A FLYBARLESS Collective Pitch Piccolo!
Well, I have joined the ranks of the people working on a flybarless collective pitch modification to the Piccolo. So far, I have flown it very successfully in the basement. It is just about as stable as the fixed pitch heli and responds a bit faster to control inputs. It is also very stable in ground effect, unlike the FP Piccolo. I have also successfully flown it outdoors in approximately 5-6 MPH winds. While it does have some small pitch up and quite a bit of translational lift in gusts, it is quite controllable at all times since the head speed stays constant as you change the pitch to react to wind gusts. I am still experimenting with blade profile and head design... I am currently using a modified flat bottomed airfoil and a damped teetering head, and indoor stability and control response is excellent.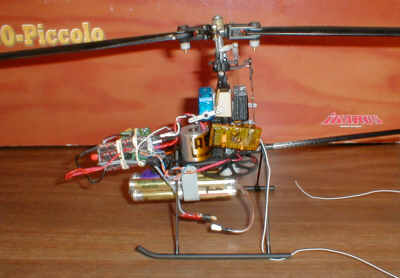
And of course, profuse thanks to the real pioneers in the quest for a collective pitch Piccolo. Alexander, Walt, John, Erez, and others that I am probably forgetting. I stand on their shoulders (and bruises)!
It has been a long hard road, but I think I have arrived at something that can be fairly easily duplicated with common workshop tools (like a drill press). And the best part is the added servo un-clips and the entire CP head assembly complete with swashplate comes off when you remove the pin that holds the anti-rotation link. I can switch from fixed pitch to collective pitch in about 60 seconds.
My blades are homemade, but they are actually fairly easy to make from a piece of spruce stock and a piece of balsa triangle "aileron stock". Glue the spruce leading edge to the aileron stock and then shape the airfoil. I used a flat bottom cross section, with a slightly rounded underside to the leading edge. I then routed a slot in the leading edge near the tip and CAd a 6 gram piece of large diameter music wire as a weight. The bolt hole is drilled about 25% back from the leading edge. My first blades came out 260mm long and 39mm wide. This is in fact just a bit too long, and they could JUST hit the tail rotor if they tried. I made a couple other sets that are 245mm long and they fly great. They weigh 12 grams each, with 6 grams of steel music wire in the leading edge at the tip. When hung by the bolt holes, they hand exactly vertical, indicating neutral stability.
Note that I am using a steel mainshaft and one way bearing kit manufactured by a fellow in France... we all call him "Nath" because that is his username on the Piccolo BBS. He can be reached at: audeg@club-internet.fr
Oh, and I find that my current has gone from about 2.2A at hover with the brushless and fixed pitch to about 2.5A with the collective pitch (at about 1500 RPM).
After flying the CP version for a month or so, I have come to really like it. It is better in wind, and much more manuverable. But the biggest gain is the controllability in a descent and the almost total absence of ground effects. I can hover it an inch off the floor and have it remain nearly motionless. In fact it is a little more stable near the ground than at altitude! Try it, you will like it!
Now, here are some photos...
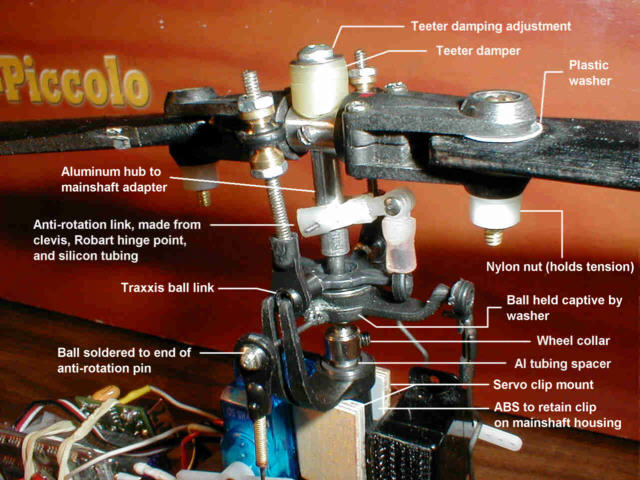
Closeup of the head and swashplate area of my modified Piccolo. The head itself is made from a Concept 30 size tail rotor assembly, with the center hole enlarged to allow the head to teeter on a pivot formed by a screw that passes through the hub and aluminum hub adapter. The hub adapter is a piece of thick walled aluminum tubing 5mm in diameter, drilled out part of the way to 3mm. It slides onto the 3mm mainshaft and is retained by the usual pin through the mainshaft. This pin also holds the homemade anti-rotation link. The upper portion of the shaft adapter is threaded for a 4-40 screw, which compresses the teeter damper made from a section of surgical tubing. The third servo linkage attachment point is a ball soldered to the end of the anti-rotation pin. Originally, the third servo was mounted to a wooden "C" (pictured above) but I have since replaced the wooden arrangement with a similarly designed clip bent from sheet aluminum. It clips over the mainshaft housing, allowing the third servo to be attached and removed in seconds. The servo mounts to the clip with thin double sided foam tape.
UPDATE: I have switched to a head made from a Nexus tail assembly. This is slightly heavier than the Concept assembly, but it has nearly zero slop in the grip bearings since it uses two conventional bearings per side versus the simple thrust bearings the Concept assembly used. The blades do not droop at rest, and it spools up much more smoothly. As a bonus, the hub is drilled and tapped for two setscrews that can be used as teeter pivots if you drill the shaft adapter in the right places.
The swashplate has been modified to accept standard size balls. Well OK, "modified" is really not quite accurate. It was "modified" in an early crash that removed the balls! Fortunately, the standard sized balls I used are threaded inside and just screw on to the stumps. A great use for the swash that you broke early on... While you cannot see it, another modification is that I have added a homemade wooden washer to the underside of the swash that traps a ball between itself and the underside of the swashplate. It was super easy to make... drill a 4.5 or 5mm hole (depends on the size of your ball) (now get your mind out of the gutter!) in a small square piece of 1/32" aircraft plywood. Chuck that in a drill press using a screw and nut. Then just "turn" it down to 1/2" (12mm) diameter using some coarse sandpaper or a file and CA it into the recess that Ikarus so thoughtfully put in the bottom of the swash. Voila! A trapped ball.
The wheel collar and spacer replace the stock fuel tubing and prevent the mainshaft from dropping. The spacer is a very short piece of aluminum tubing that is a slip fit over the 3mm mainshaft and prevents the wheel collar from rubbing on the edge of the upper bearing.
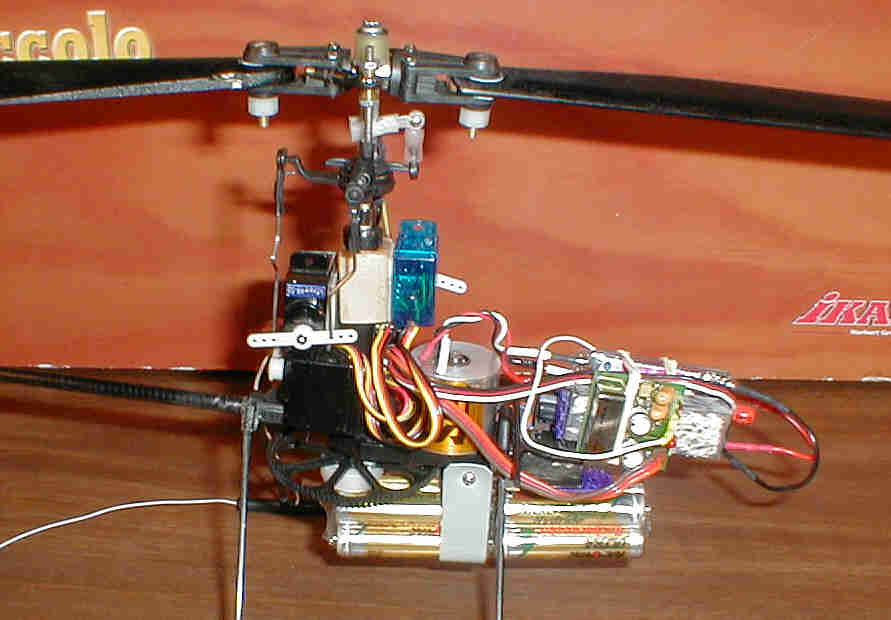
View from the right side of the heli, showing the third servo, the Shulze Future 18be brushless controller, the gyro (mounted to the side of the Shulze) and the Astroflight AF010 brushless motor.
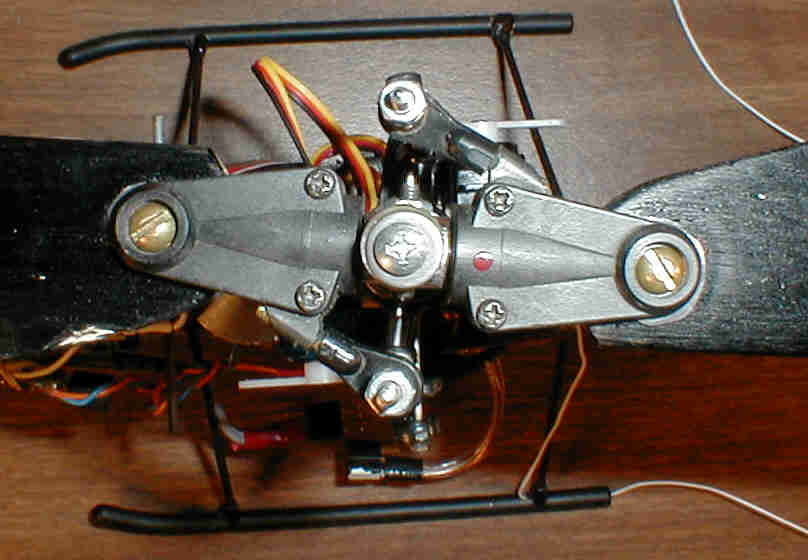
Top view of the head assembly. Note that I cut the control balls off and drilled the stumps to accept a standard 2-56 threaded rod. The ball links are screwed to the 2-56 rod.
View from the left side of the heli. The yellow-green shrink wrapped board in the rear is the Berg6 Mini receiver, mounted to the rear of the mainshaft housing to keep it away from the Shulze and JMP HF9 controllers. I have to put in a plug for the Berg6 Mini, too. It is a great little receiver... full range and fully narrowband with NO interference problems EVER. Available from RC-Direct out in California. You can also just make out the JMP HF9 tail ESC rubber banded to the side of the Shulze controller.